The Form Assembly
The Form Assembly allows you to easily create web forms and collect responses. You build the web forms on their site. To deploy, you have the choice of having your form hosted on formassembly.com or downloading the code needed to run the form on your own site. The data is then collected in their service. For Salesforce.com users, they provide a way to use the Form Assembly functionality while having the data sent through to Salesforce.com. You can think of Form Assembly as a way to create solid web-to-lead pages and leverage some of their built in functionality like SSL encryption and pre-defined form rules (required fields, conditions, etc.). You could also use it for general web development even if Salesforce is not involved.
Functionality
Setting up a form is simple. You work within a drag & drop interface to do so. They allow you to add many types of fields (text, text area, picklists, radio buttons, password (masked) text, etc.). They also have some pre-defined fields for things like all US states, or all countries. The form builder allows for properties such as required fields, formatting checks (alphanumeric, email format, etc.) This Form Builder is very useful for web developers whether or not you ever plan on putting the information into Salesforce.com.

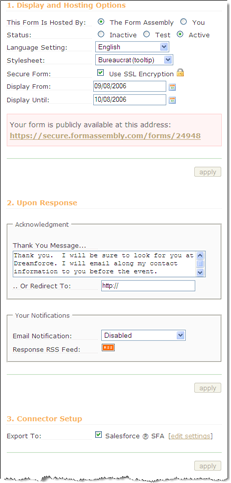
After setting up your form, you have some Main Options.
- Decide whether to host your form on Form Assembly or to host it yourself.
- An active, inactive and testing status allow you some flexibility in developing your form.
- Choose to utilize SSL encryption.
- Set effective dates for your form
- Setup Thank You text to be displayed after the form has been submitted OR choose to redirect the user to your own custom page.
- Enable email notification to notify the submitter, for example, that their information has been received.
In the Connector Setup options, you can choose whether or not you want to bring the data to Salesforce too. Going through this process will result in enabling the form as a web-to-lead form. Check that box and click “edit settings” to setup this functionality.

Salesforce Field Mapping:

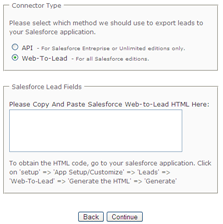
The next step is Connecting to Salesforce. You can choose to provide a username and password for API access or you can do a web-to-lead form. I opted for the web-to-lead form. To get this setup, you need to go into your Org and generate the web-to-lead HTML. When I did it, I kept all fields selected. Then you copy that and paste it into the form assembly box (see the left hand graphic). The Form Assembly will read that information and automatically point the form to your Org and will gather all of the field information.
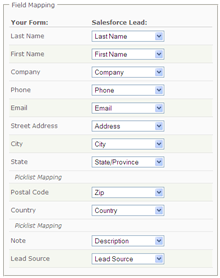
The last step is the Salesforce Field Mapping. This allows you to map the fields from the form you created in the Form Assembly to your Org’s Salesforce.com fields. I was even able to create hidden fields in my Form Assembly form and map them to Salesforce fields (e.g. to default a lead source value for all submissions).
For more details on setting up a Salesforce connected form, see their blog post on the subject.
Pricing
The Salesforce connector is only available in the Professional Plan, which runs $34/month. You can read about all their pricing on their Plan Comparison page. For non-Salesforce web development, there are plans ranging from free (ad supported, no SSL, no branding) to $9/month (the Subscription Plan with no ads, supports SSL, brand the forms). The only difference between the Subscription Plan ($9/month) and the Professional Plan ($34/month) are:
- The Salesforce connector
- A generic connector, similar to the Salesforce one, that can post data back to any third-party script. (coming soon)
- An email validation service that can send a confirmation request to any email address submitted with a form. (coming soon)
Opinion
I have enjoyed using the Form Assembly. I was given a trial Professional Plan account and have been very happy with the functionality. I could see this being very useful for the organization that uses a lot of different web to lead forms and needs to manage their development and also leverage functionality such as validation and formatting. However, these same organizations are typically pretty adept at creating web to lead forms where they may not need such as service. Catch 22.
The only issue I had with the service was that I had to re-map my data to Salesforce fields after making somewhat minor changes to the form. If I changed a field label or moved a field from a form section to outside a section, I needed to re-map it. Not a big deal, but could be if you were editing a live form and making on-the-fly edits. It could cause you to not capture information until you notice the mistake.
All in all, I was pretty impressed with the service and it’s ability to tie into Salesforce.
My Form
I will be attending Dreamforce this year. If you will be too, submit your contact information to me using the Form Assembly form I created for this review. I will be sure to email you my contact information before the event and we can hopefully meet each other there.
