Arrowpointe Maps Passes Security Review

Salesforce conducts a security audit for all AppExchange applications on an annual basis.  I am pleased to report that Arrowpointe Maps has once again passed this review and has been certified for another year.

Comments off comments feed

Hosted Email-to-Case Agent coming in Spring ’09

A nice feature was recently tagged as coming in the Spring ’09 release, Email to Case Agent Built in Salesforce.  Finally, this means companies can run Email to Case without having to worry about managing an agent to run on a local system.

Email to Case is a really nice feature.  It’s biggest drawback has been the requirement to host an agent yourself to monitor an IMAP inbox.  This is what stopped me from using it.  With the new feature, I am likely to start using it for email support of my products.

If you want to follow what’s coming in this next release, use this RSS Feed.

Comments (2) comments feed

Calling Apex Web Services from PHP

Apex Code can be exposed as a Web Service and made available outside of your Salesforce environment (e.g. from a PHP page). This approach essentially lets you build a personal API into your Salesforce org and eliminates the need for calling standard API methods in PHP code where it is vulnerable to your configuration changes.

Working with the folks over at MK Partners on some recent projects, I’ve learned how to call into Apex Web Services from PHP. It’s actually pretty easy. Special thanks for Simon Fell for helping me through a particularly tricky part.

Apex Web Service Class

A simple web service class is below. The method we call from PHP is myMethod. There are 2 inner classes that are used to capture inputs and send back outputs to PHP.

global class MyWebService {

    // A class to accept an array of input records (e.g. product/amount combinations)
    global class myInputs{
        webservice Id productId;
        webservice Double amount;
    }
    
    // A class to send back as an output to PHP
    global class myOutputs{
        webservice String errorMessage;
        webservice Boolean success;
        webservice List<myInputs> inputs;
        webservice Id contactId;
    }

    // The actual web service method we will call
    webservice static myOutputs myMethod(Id contactId, List<myInputs> inputs){
    
        /* 
        * Write a bunch of code here to do all kinds of stuff.
        */
        
        myOutputs output = new myOutputs();
            output.errorMessage = 'No errors here.';
            output.success = true;
            output.inputs = inputs;
            output.contactId = contactId;
        return output;
        
    }
}
PHP

Login like you normally would using the PHP toolkit. Nothing new here. The final part is defining some constants for use later when we call the web service.

// Include the PHP Toolkit
require_once('salesforceAPI/SforcePartnerClient.php');
require_once('salesforceAPI/SforceHeaderOptions.php');

// Login
$sfdc = new SforcePartnerClient();
$SoapClient = $sfdc->createConnection('salesforceAPI/wsdl.xml');
$loginResult = false;
$loginResult = $sfdc->login('user@domain.com', 'password' . 'securitytoken');

// Define constants for the web service. We'll use these later
$parsedURL = parse_url($sfdc->getLocation());
define ("_SFDC_SERVER_", substr($parsedURL['host'],0,strpos($parsedURL['host'], '.')));
define ("_WS_NAME_", 'MyWebService');
define ("_WS_WSDL_", _WS_NAME_ . '.xml');
define ("_WS_ENDPOINT_", 'https://' . _SFDC_SERVER_ . '.salesforce.com/services/wsdl/class/' . _WS_NAME_);
define ("_WS_NAMESPACE_", 'http://soap.sforce.com/schemas/class/' . _WS_NAME_);

Next we will call the web service. First thing to do is setup a Soap Client and modify the headers. Then we are setting up some fake data that maps to the expected inputs of the myMethod method in the web service. Then we actually call the web service.

// SOAP Client for Web Service
$client = new SoapClient(_WS_WSDL_);
$sforce_header = new SoapHeader(_WS_NAMESPACE_, "SessionHeader", array("sessionId" => $sfdc->getSessionId()));
$client->__setSoapHeaders(array($sforce_header));

// Setup fake data to send into the web service
$prodAmtArray = array();
	$prodAmtArray[] = array('productId'=>'01t60000000lvBN','amount'=>100);
	$prodAmtArray[] = array('productId'=>'01t60000000lvBS','amount'=>200);

$wrkArray = array(
				'contactId'=>'0036000000nVtpT',
				'inputs'=>$prodAmtArray
				);
				
// Call the web service
$response = $client->myMethod($wrkArray);

// Output results to browser
echo "<p><pre>" . print_r($response, true) . "</pre></p>";
echo "Contact Id is " . $response->result->contactId;

Results

Below displays what those 2 echo statements output.

stdClass Object
(
    [result] => stdClass Object
        (
            [contactId] => 0036000000nVtpTAAS
            [errorMessage] => No errors here.
            [inputs] => Array
                (
                    [0] => stdClass Object
                        (
                            [amount] => 100
                            [productId] => 01t60000000lvBNAAY
                        )
                    [1] => stdClass Object
                        (
                            [amount] => 200
                            [productId] => 01t60000000lvBSAAY
                        )
                )
            [success] => 1
        )
)
Contact Id is 0036000000nVtpTAAS
One last little trick

One annoyance during the development of Apex Web Services is having to continually generate a WSDL for the web service. When testing, I would find that I would continually need to put a new WSDL on the web server. I decided to automate this where I could add a variable to the queryString and have PHP refresh the WSDL on my web server. You need the cURL module for this, but most PHP installs have it.

$ch = curl_init();
	$fp = fopen(_WS_WSDL_, "w");
	curl_setopt($ch, CURLOPT_URL, _WS_ENDPOINT_);
	curl_setopt($ch, CURLOPT_FILE, $fp);
	curl_setopt($ch, CURLOPT_HEADER, 0);
	curl_setopt($ch, CURLOPT_SSL_VERIFYPEER, 0);
	curl_setopt($ch, CURLOPT_SSL_VERIFYHOST, 0);
	curl_setopt($ch, CURLOPT_COOKIE, 'sid='.$sfdc->getSessionId());
	setcookie("sid", $sfdc->getSessionId(), 0, "/", ".salesforce.com", 0);
	curl_setopt($ch, CURLOPT_TIMEOUT, 30);
	curl_exec($ch);
	fclose($fp);
curl_close($ch);

If you have experience with this kind of integration, please comment here on other tips & tricks.

Comments (23) comments feed

Campaign Member Summary using Google Charts

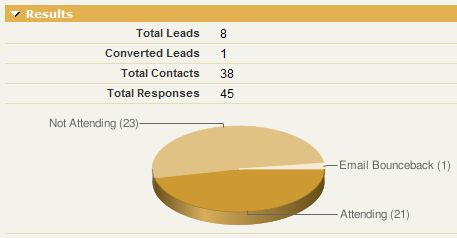
I was inspired by Sam Arjmandi’s post about embedding Google Charts into VisualForce pages.  I have a use case that requires a little different approach.  I needed to get a quick view of the Campaign Member Statuses for a Campaign.  I went ahead and started with Sam’s example and tweaked it for my purpose.  Here’s the result!

It’s an embedded VisualForce component in the Results section of my Campaign page.  It shows a quick count for each Member Status that is being used.  To get it going in your org, here’s what you need.

VisualForce Page

It’s a simple page containing 1 DIV so that I can set the background color to match that of a Page Layout.  Other than that it’s just an image returned from Google Charts.  There is a lot of flexibility with Google Charts.  Therefore, I made it so most of the URL can be tweaked in VisualForce. Only the data values and its labels come from the controller.  This is nice because you can edit VF in a production org, but you can’t edit Apex. This will let you change things like width, height, chart colors, chart type, etc.


<apex:page standardController="Campaign" extensions="VFController_CampaignMemberStatusChart">
    <style>
        #DIV_Container{padding: 0; margin: 0; background-color: #F3F3EC;}
    </style>
    <div id="DIV_Container">
        <!-- See http://code.google.com/apis/chart/ for more info on customizing the chart -->
        <apex:image url="http://chart.apis.google.com/chart?cht=p3&chs=1000x125&chf=bg,s,F3F3EC&chco=CC9933{!chartData}"></apex:image>
    </div>
</apex:page>

Apex Controller
The controller is an extension of the Campaign standard controller. This is so the VisualForce page becomes an option to include on a Campaign Page Layout. The method that does all the work is getChartData. It gets the available Campaign Member Statuses and then queries the Campaign Member object for that Campaign and adds a data/label value for each one. It then returns a query string that you include into the Image src on the Visual Force page.

I am bad at Test classes, but there is 1 in there that passes and should be good enough. This functionality is pretty harmless.

public class VFController_CampaignMemberStatusChart {

	private final Campaign camp;

	public VFController_CampaignMemberStatusChart(ApexPages.StandardController stdController) {
		this.camp = (Campaign)stdController.getRecord();
	}
	
	public String getChartData() {
		
		// The list of chart items	
		List<ChartDataItem> items = new List<ChartDataItem>();
		
		// List of valid Campaign Member Statuses for the Campaign
		List<CampaignMemberStatus> list_cms = [select Id, Label from CampaignMemberStatus where CampaignId = :camp.id];
		
		// Loop through each Campaign Member Status, get a count of Campaign Members and add it to the items list 
		for (CampaignMemberStatus cms:list_cms) {
			integer Count = [select count() from CampaignMember where CampaignId = :camp.id AND Status = :cms.Label];
			if (Count > 0) {
				items.add(new ChartDataItem(cms.Label, Count.format()));
			}
		}
		
		// Initialize Strings
		String chd = ''; // Data
		String chl = ''; // Labels
	
		for(ChartDataItem citem : items) {
			chd += citem.ItemValue + ',';
			chl += citem.Label + ' (' + citem.ItemValue + ')|';
		}
		
		//remove the last comma or pipe
		if (items.size() > 0) {
			chd = chd.substring(0, chd.length() -1);
			chl = chl.substring(0, chl.length() -1);
		}
		
		// We are only returning the values and labels. The rest of the URL string is in the VF page
		String result = '&chd=t:' + chd + '&chl=' + chl; // &chl returns with labels pointing to pie pieces
		//String result = '&chd=t:' + chd + '&chdl=' + chl; // &chdl returns with labels in a legend
		
		return result;
	}

	// Class holding each chart data item
	public class ChartDataItem {
		public String ItemValue {get; set;}
		public String Label {get; set;}
		
		public ChartDataItem(String Label, String Value)
		{
			this.Label = Label;
			this.ItemValue = Value;
		}
	}
	
	static testMethod void testVFController_Sidebar_Summary() {
		
		// Create Campaign
        Campaign c = new Campaign();
        c.Name = 'Test Campaign';
        insert c;
        
        // Create Lead
        Lead l = new Lead();
        l.LastName = 'Last Name';
        l.Company = 'Company';
        insert l;
        
        // Create Campaign Member
        CampaignMember cms = new CampaignMember();
        cms.CampaignId = c.id;
        cms.LeadId = l.id;
        insert cms;
		
		test.startTest();
		
		ApexPages.StandardController sc = new ApexPages.StandardController(c);
		VFController_CampaignMemberStatusChart controller = new VFController_CampaignMemberStatusChart(sc);
		String s1 = controller.getChartData();
		
		test.stopTest();
	}

}

Page Layout
When you add it to the Page Layout, make the height of the component the same as the height you specified in the VF page’s image src for Google Charts. In this example, it’s 125. Doing this will ensure the background colors match your Page Layout.

Comments (7) comments feed

ActevaRSVP Review

The demandblog has been posting some AppExchange application reviews recently.  They did a good one for ActevaRSVP, who has a pretty impressive product.  See their review at http://demandbase.typepad.com/demand/2008/10/dreamforce-prev.html.

Note: ActevaRSVP is a current advertiser on this blog.

Comments off comments feed

Next entries » · « Previous entries