Archive for Configuration Category Feed

Make your Mass Email Activities more meaningful

It had always bothered me that activities generated from Mass Emails only had a subject of “Mass Email:” and nothing in the body.  I couldn’t tell what I mass emailed to someone!

Deep inside the forums, I found the trick to get some meaning into those activities.  The best you can do is get the Subject filled in, but that’s something.  The subject for a Mass Email = “Mass Email: Email Template Description“.  Giving your email templates a description is the only way to get a meaningful mass email activity.  The Description is an often overlooked field on Email Template because it’s not required, so go make sure you have it filled in.

Once you do this, the next Mass Email you send can start having some meaning.

I created an idea on Idea Exchange for what I think a better design would be.  Vote on it and comment there to improve the recommendation.

Comments off comments feed

Getting Standard Object Meta Data into the Force.com IDE

Salesforce on Rails has an interesting post on how you can get the meta data for standard objects into the Force.com IDE for easy manipulation of its configuration via the Meta Data API capabilities built into the IDE.

Comments (1) comments feed

Derive a Rating using Formulas

On a recent project, I was helping my client prioritize their lead data. They were having trouble with the default Rating field in Salesforce because 1) it required a user to populate the record and 2) the rating should change with the passing of time.

I came up with a formula that takes the Lead Status and Expected Close Date (a custom field) into account in order to derive a Rating value on a Lead. This client happens to use Leads for their entire sales cycle and converts Leads once they are sold, but this concept would apply to equally to Opportunities as well.

Requirements

The simplified requirements are to derive a Rating value as follows:

Lead Status / Days to Close 0 to 30 days 31 to 60 days 61 to 90 days over 90 days
New New New New New
Contacted Warm Warm Cold Cold
Interested Warm Warm Warm Cold
Presentation Hot Warm Warm Cold
Sent I/O Hot Hot Hot Warm
Sold Won Won Won Won
Lost – No Contact Lost Lost Lost Lost
Lost – No Budget Lost Lost Lost Lost
Lost – Not Interested Lost Lost Lost Lost

They plan to manage their pipeline closely using the derived Rating field. They want the Rating to get "better" as time passes, so that they can reinforce the use of the Expected Close Date field. For example, if there is a Lead in Presentation status and it gets forgotten by Sales, that lead’s rating will eventually get to "Hot" as the Expected Close Date approaches or is passed. Management will be asking about that Lead and it will either be accurate or the Expected Close Date will be updated to better reflect reality. Over time, they will really be able to trust the Expected Close Date field, which is a new field for them.

Solution

To accomplish this, I did the following:

  1. Added a custom field on Leads called Expected Close Date. This would be filled out by the end-user and acts like the Close Date does on an Opportunity.
  2. Added a custom formula field called Days to Close that calculates how many days away the Expected Close Date is. The formula is as follows:

    Expected_Close_Date__c – TODAY()

    This field was added to the Page Layout because it is pretty useful in and of itself. Also, the client is on Professional Edition, so we wanted this field available in reports and that’s how you make it visible.

  3. Added a custom formula field called Rating (derived) that calculates a rating value using the requirements from the table above. I use this formula approach (using the CASE function) whenever I am doing some kind of matrixed formula result.
    CASE(1,

    IF(ISPICKVAL( Status ,"New"), 1, 0),"New",

    IF(AND(ISPICKVAL( Status ,"Contacted"), Days_to_Close__c <= 60), 1, 0),"Warm",
    IF(AND(ISPICKVAL( Status ,"Contacted"), Days_to_Close__c > 60), 1, 0),"Cold",

    IF(AND(ISPICKVAL( Status ,"Interested"), Days_to_Close__c <= 90), 1, 0),"Warm",
    IF(AND(ISPICKVAL( Status ,"Interested"), Days_to_Close__c > 90), 1, 0),"Cold",

    IF(AND(ISPICKVAL( Status ,"Presentation"), Days_to_Close__c <= 30), 1, 0),"Hot",
    IF(AND(ISPICKVAL( Status ,"Presentation"), Days_to_Close__c <= 90), 1, 0),"Warm",
    IF(AND(ISPICKVAL( Status ,"Presentation"), Days_to_Close__c > 90), 1, 0),"Cold",

    IF(AND(ISPICKVAL( Status ,"Sent I/O"), Days_to_Close__c <= 90), 1, 0),"Hot",
    IF(AND(ISPICKVAL( Status ,"Sent I/O"), Days_to_Close__c > 90), 1, 0),"Warm",

    IF(ISPICKVAL( Status ,"Sold"), 1, 0),"Won",

    IF(ISPICKVAL( Status ,"Lost – No Contact"), 1, 0),"Lost",
    IF(ISPICKVAL( Status ,"Lost – No Budget"), 1, 0),"Lost",
    IF(ISPICKVAL( Status ,"Lost – Not Interested"), 1, 0),"Lost",
    "")

  4. The Lead Views and Reports we made for reps are driven by this derived field. By doing this, they have 1 simple value to prioritize on. Also, as new Lead Statuses emerge or if we re-define what "Hot" means, we only need to modify the formula. When we do, all the reports and views automatically pick it up since they are not hardcoding filters on the Lead Status of Expected Close Date fields.

Does anyone else use an approach like this? Any suggestions to make it better?

Depending upon complexity, it is possible to hit formula size limits. Especially considering the need to use the ISPICKVAL function for the Lead Status. Vote on this idea to fix the ISPICKVAL issue.

Comments (2) comments feed

Opportunity Roll-Up Summary Recommendations

Salesforce released Opportunity Roll-Up Summary fields on the Account object in the Spring 08 release. This is a pretty useful feature and below are some recommendations to help you get started using them.

One of the major benefits of this feature is that you now get quick answers on the Accounts you are selling to without having to run an Opportunity report and get multiple records for the same Account. If you sell to a customer multiple times throughout the year, that customer will be represented once in an Account report, but will be represented multiple times (once for each sale) in an Opportunity report.

Create the Fields

To get started, create a new Account field and choose the Roll-Up Summary option and click Next.

rollup_summary_newfield.jpg

Next, give it a name. I’d like to recommend a naming convention because you will probably create multiple of these. My personal naming convention is used in the example fields below. For the API name, you should also use a naming convention. This will help keep these fields together when viewed in Eclipse or Explorer.

After clicking Next, your options are to COUNT, SUM, MIN, MAX information from the Opportunity. Below is a table with some ideas for fields you that might be useful:

Field Name Rollup Type Field to Aggregate Filter Criteria
$ Opportunities (Open) SUM Amount Closed = False
$ Opportunities (Open – This Year) SUM Amount 1) Closed = False
2) Close Date = THIS YEAR 1
$ Opportunities (Won) SUM Amount Won = True
$ Opportunities (Lost) SUM Amount 1) Won = False
2) Closed = True
# Opportunities (Open) COUNT N/A Closed = False
# Opportunities (Open – This Year) COUNT N/A 1) Closed = False
2) Close Date = THIS YEAR
# Opportunities (Won) COUNT N/A Won = True
# Opportunities (Lost) COUNT N/A 1) Won = False
2) Closed=True
Using Formulas on the Rollups

One really nice thing about these Rollup fields is that you can use their results in your regular formula fields. Using the rollup fields I mentioned above, we can use formula fields on the account to create the fields such as:

  • Win Rate (%) = # Opportunities (Won) / (# Opportunities (Won) + # Opportunities (Lost))
  • Avg Win Amount = $ Opportunities (Won) / # Opportunities (Won)
Using the Roll-Ups

Now those rollup fields can come in handy in reporting to do things like:

  • Filter for all sold-to Accounts: $ Opportunities (Won) > 0
  • Filter for all Accounts with Open Opportunities: # Opportunities (Open – This Year) > 0

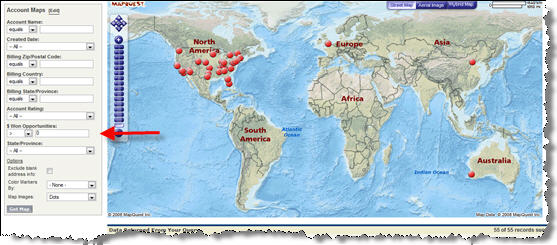
Another possiblity is in, say, an application that allows you to map your Salesforce.com data. Adding the $ Opportunities (Won) field onto the query page makes generating a map of all sold-to accounts a breeze.

arrowpointemaps_AllWonAccounts.jpg

What about you? How are you using Roll-Up Summary fields?

1 [back] – Other date filters include THIS QUARTER, THIS MONTH, LAST MONTH, NEXT YEAR, NEXT QUARTER, etc. Refer to the Salesforce help for more. These date filters are particularly useful for rollup summary fields.

Comments (11) comments feed

Authorize logins from any IP address

Salesforce has mostly implemented their security changes. FYI, this is the help file page explaining to admins how to setup Network Access in the application and what happens when a user logs in.

If you have an org that you need access to without the burden of this restriction (e.g. an org you use to perform demos at various locations and/or from many different computers where you might not have email access), you can authorize all IPs by making 0.0.0.0 the start IP and 255.255.255.255 the end IP in a Network Access record.

Doing this will essentially put that org’s security back to what it was before Salesforce made their enhancements. I wouldn’t recommend making this change unless you actually need it, but it can come in handy even if for a short-term fix.

This is the approach Salesforce.com has taken for Test Drive orgs on AppExchange listings so that Test Drive users are not restricted access to a demo. All of my Test Drives had a record with this range pre-populated by Salesforce when they made their security changes.

Note: I do not recommend anyone do this for their corporate Salesforce.com org as this would negate all the good work Salesforce has done to button things up.

Comments (5) comments feed

Next entries » · « Previous entries