Archive for Tips Category Feed

Link Chatter Files to Related Objects

I prefer to upload “attachments” to records using Chatter Files vs. the old skool Attachments because…

  • Chatter Files are searchable
  • They still get listed under the Notes & Attachments list for a record
  • I get the nice file previewer (most of my files are PDFs)
  • I can store them once and link them to anything else

It’s that last point that is especially cool and cannot be done with regular Attachments. “Store Once, Link Anywhere

One major difference, though, between old skool Attachments and Chatter Files is that Attachments would get linked up to the Parent Records too, at least for Standard Objects. This was nice. I could add an Attachment to an Opportunity and see it listed under the Account without needing to do anything special. Chatter Files do not do this. You can manually make it do this, but it’s not automated.

Let’s automate this missing feature!

Trigger
Simple little trigger to gather IDs and call an @future event in a class. Note that the call is wrapped in the IF statment checking to see if we are already in an @future or batch context. For any trigger that calls an @future event, please always wrap the call like this.

trigger FeedItems on FeedItem (after insert) {

	// AFTER INSERT
	if(Trigger.isAfter && Trigger.isInsert){
		
		List<ID> IDs = new List<ID>();
		for (FeedItem fi : trigger.new){
			IDs.add(fi.id);
		}
		
		if(!system.isFuture() && !system.isBatch()){
			FeedItems.linkChatterFiles(IDs);
		}
		
    }
	
}

Apex Class
I have the method written to only process a single ContentPost (assuming the UI is being used), but if you want to bulkify, be my guest.

What we are doing in the class is gathering the IDs of records we also want to link the file to. For me, I want to link files I post to Opportunities to the parent Account and files I post to Cases to the related Contact and Account. It’s up to you what to link.

One important step in there is to gather a list of records the file is already linked to. Towards the end of the code, we remove those IDs from the master list so we do not link them all over again with a new Chatter Post.

Take note of the InProcess boolean. This is a technique to prevent recursion. Since our trigger is on FeedItem and our method creates more FeedItems, we don’t want the trigger to keep firing.

public class FeedItems {

    public static Boolean inProcess = false;
	
    // Links Chatter Files on certain objects to related objects
    @future 
    public static void linkChatterFiles(List<Id> IDs) {
    	
    	// Only run for individual posts of files
    	if(IDs.size() == 1 && inProcess == false){
    		
    		inProcess = true; // turn on so we don't do recursive loops
    		List<FeedItem> FIsToInsert = new List<FeedItem>(); // list we will be inserting
    		
	    	for (FeedItem f: [select id, type, RelatedRecordId, parentId, title, body from FeedItem where id in:IDs and type = 'ContentPost']){
				
				// Verify fields that we cannot use to filter SOQL
				if (f.RelatedRecordId == null) { continue; }
				
				// Get ContentVerion record
				ContentVersion cv = [select id, ContentDocumentId from ContentVersion where id = :f.RelatedRecordId][0];
				
				// Get list of IDs this Content is already linked to so we don't do duplicate posts
				Set<Id> IDsAlreadyLinked = new Set<Id>();
				for (ContentDocumentLink cdl : [SELECT ContentDocumentId, LinkedEntityId FROM ContentDocumentLink where ContentDocumentId = :cv.ContentDocumentId]){
					
					IDsAlreadyLinked.add(cdl.LinkedEntityId);
					
				}
				
				// Depending on the object, link the content to different other objects
				Set<Id> IDsToLink = new Set<Id>();
				if (String.valueOf(f.parentId).startsWith( Opportunity.sObjectType.getDescribe().getKeyPrefix() )){
					
					Opportunity o = [select id, accountId from Opportunity where id = :f.ParentId limit 1][0];
					if(o.AccountId != null){ 
						IDsToLink.add(o.AccountId);
					}
					
					
				} else if (String.valueOf(f.parentId).startsWith( Case.sObjectType.getDescribe().getKeyPrefix() )){
					
					Case c = [select id, accountId, contactId from Case where id = :f.ParentId limit 1][0];
					if(c.AccountId != null){ 
						IDsToLink.add(c.AccountId);
					}
					if(c.contactId != null){ 
						IDsToLink.add(c.contactId);
					}
					
				}
				
				// Remove the IDs that are already linked so we don't create duplicate posts 
				IDsToLink.removeAll(IDsAlreadyLinked);
				
				// Create a new FeedItem for each of the records we want to link to
				for (ID theId : IDsToLink){
					FeedItem newFI = new FeedItem();
						newFI.Type = 'ContentPost';
						newFI.RelatedRecordId = f.RelatedRecordId;
						newFI.ParentId = theId;
						newFI.title = f.title;
						newFI.Body = f.body;
					FIsToInsert.add(newFI);
					
				}
				
			} // end main loop
		
			// INSERT
			if (!FIsToInsert.isEmpty()){ database.insert(FIsToInsert, false); }
				
    	} // end check for 1 record in trigger
    	
    } // end of linkChatterFiles method
    
}

Test
And the Test code. We have a separate method for each object we want to test posting a file to. I should have some asserts in there to test it actually works, but I don’t have those yet. That’s your homework.

@isTest 
private class FeedItems_Test {

    static testMethod void linkChatterFiles_Oppty() {
    	
    	Account a = new Account(name='test');
    	insert a;
    	
    	Contact c = new Contact (FirstName = 'Joe', LastName = 'Shmo', AccountId = a.id);
    	insert c;
    	
    	OpportunityStage stage = [select MasterLabel from OpportunityStage where IsClosed = false limit 1];
    	
    	Opportunity o  = new Opportunity();
        o.Name         = 'TEST'; 
        o.AccountId    = a.id;
        o.CloseDate    = Date.today(); 
        o.StageName    = stage.masterlabel;
        insert o;
        
        ContentVersion cv = new ContentVersion(); 
		cv.Origin = 'H';
		cv.PathOnClient='myFile.txt';
		cv.Title ='myFile'; 
		cv.VersionData = Blob.valueOf('I am a file posting to Chatter');
		insert cv;
		
		FeedItem contentFI = new FeedItem();
		contentFI.Type = 'ContentPost';
		contentFI.ParentId = o.id; // Opportunity
		contentFI.RelatedRecordId = cv.id;
		contentFI.title = 'Content Post';
		contentFI.Body = 'Body of content post';
		insert contentFI;
		
    }
    
    static testMethod void linkChatterFiles_Case() {
    	
    	Account a = new Account(name='test');
    	insert a;
    	
    	Contact c = new Contact (FirstName = 'Joe', LastName = 'Shmo', AccountId = a.id);
    	insert c;
    	
    	Case cs = new Case();
        cs.subject = 'Test';
        cs.ContactId = c.id;
        cs.AccountId = a.id;
        insert cs;
        
        ContentVersion cv = new ContentVersion(); 
		cv.Origin = 'H';
		cv.PathOnClient='myFile.txt';
		cv.Title ='myFile'; 
		cv.VersionData = Blob.valueOf('I am a file posting to Chatter');
		insert cv;
		
		FeedItem contentFI = new FeedItem();
		contentFI.Type = 'ContentPost';
		contentFI.ParentId = cs.id; // Case
		contentFI.RelatedRecordId = cv.id;
		contentFI.title = 'Content Post';
		contentFI.Body = 'Body of content post';
		insert contentFI;
		
    }
        
}

Enjoy!

Comments (1) comments feed

UPDATE: Set Defaults for Opportunity Contact Roles (when converting)

I’ve had a few people reach out regarding an old post about defaulting Opportunity Contact Roles on a Lead convert. Turns out the trigger on Opportunities is not the best option. This was resolved in the comments by having a trigger on Leads instead, but wanted to give the full update in it’s own blog post with updated code. The code below should work and now includes a Test Class too.

Having an AFTER UPDATE trigger on Leads like this is a good way to handle many post-convert needs.

Trigger

trigger Leads on Lead (after update) {
	
    if(Trigger.isAfter && Trigger.isUpdate){
        Leads l = new Leads();
        l.SetContactRoleDefaults(Trigger.new, Trigger.oldMap);
    }

}

Class

public class Leads {
    
// Sets default values on the Opportunity and Opportunity Contact Role record created during Conversion. Called on AFTER UPDATE
public void SetContactRoleDefaults(Lead[] leads, map<ID,Lead> old_leads) 
{
	
	set<ID> set_opptyIDs = new set<ID>();
	    		
	// Get Opportunity IDs into a Set if the lead was just converted and an Opportunity was created
	for (Lead l:leads){
		if (l.IsConverted && !old_leads.get(l.id).IsConverted){
			if (l.ConvertedOpportunityId != null){
				set_opptyIDs.add(l.ConvertedOpportunityId);
			}
		}
	}
	
	// Update Opportunity Contact Roles
	list<OpportunityContactRole> list_opptyContactRolesToUpdate = new list<OpportunityContactRole>();
	for(OpportunityContactRole ocr:[select Id,IsPrimary,Role from OpportunityContactRole where OpportunityId in :set_opptyIDs]) { 
		ocr.IsPrimary = true;
		ocr.Role = 'Decision Maker'; // set to what you want defaulted
		list_opptyContactRolesToUpdate.add(ocr);
	}
	
	if (list_opptyContactRolesToUpdate.size() > 0) {
		update list_opptyContactRolesToUpdate;
	}
	
}

}

Test Class

@IsTest 
private class Leads_Test {

static testMethod void SetContactRoleDefaults_Test() {
    
    // Create a Lead
    Lead l = new Lead();
    l.lastname = 'Lastname';
    l.firstname = 'FirstName';
    l.company = 'Company';
    insert l;
    
    // Convert the Lead
    Database.LeadConvert lc = new database.LeadConvert();
    lc.setLeadId(l.id);
	
    LeadStatus convertStatus = [Select Id, MasterLabel from LeadStatus where IsConverted=true limit 1];
    lc.setConvertedStatus(convertStatus.MasterLabel);
	
    Database.LeadConvertResult lcr = Database.convertLead(lc);
    System.assert(lcr.isSuccess());
	
    // Query Contact Role Records and Asserts all was set correctly.
    for (OpportunityContactRole ocr:[select Id,IsPrimary,Role from OpportunityContactRole where OpportunityId = :lcr.getOpportunityId()]){
        system.AssertEquals('Decision Maker', ocr.Role);
        system.AssertEquals(true, ocr.IsPrimary);
    }
    
}

}

Comments (5) comments feed

Email AutoComplete (using jQuery)

For several years, I’ve been using an app called Email AutoComplete (it’s now a private listing) to add auto complete capabilities onto my email address text boxes in the Salesforce email editor.  It’s a nice little app.  However, Arrowpointe started using Email to Case Premium (an app I highly recommend) and I wanted to have similar capabilities on their forms.

The Email AutoComplete app works well, but it written using s-Controls and Yahoo User Interface Library v2, which adds a lot of confusing code into it. It was too hard for me to change and apply to the Email to Case Premium pages.  I looked for a jQuery approach and leveraged ideas from a great blog post on the Vertical Code blog. In my case, however, I was trying to add this capability onto an AppExchange “managed” (i.e. locked down) page and onto the standard email forms from Salesforce. I didn’t have the luxury of an Apex Controller and Visualforce.

Enter the AJAX API and jQuery!

Question: How do I obtain the Session Id?

Answer: Create a Visualforce page to act as a JavaScript file. In this case, I am creating a global JavaScript variable called _my_sfdcSession.

<apex:page sidebar="false" showHeader="false" contentType="application/javascript" cache="false">
  var _my_sfdcSession = "{!$Api.Session_Id}";
</apex:page>

Question: How do I enable API access in Salesforce and turn on jQuery so its usable whereever I am (almost) in Salesforce?

Answer: Use the sidebar to inject the code. I use the Messages & Alerts sidebar item, but the same could also be done using a custom sidebar component. The key is that the component always be in the sidebar.

The code below loads the Visualforce page above to get the Session Id. Then it loads the AJAX toolkit (from Salesforce), jQuery (from Google CDN) and jQueryUI (from Google CSN). Note that the jQuery instance is put into a new variable called $_org using the jQuery.noConflict() method. I chose that variable name because I am assuming it won’t conflict with other solutions that rename jQuery.

<!-- Load Session Id -->
<script src="https://na1.salesforce.com/apex/loadSessionId?core.apexpages.devmode.url=1"></script>
<!-- Load AJAX Toolkit -->
<script src="https://na1.salesforce.com/soap/ajax/23.0/connection.js" type="text/javascript"></script>
<!-- Load jQuery -->
<script src="https://ajax.googleapis.com/ajax/libs/jquery/1.7.0/jquery.min.js"></script>
<script type="text/javascript">
var $_org = jQuery.noConflict();
</script>
<!-- Load jQuery UI -->
<link rel="stylesheet" href="https://ajax.googleapis.com/ajax/libs/jqueryui/1.8.16/themes/base/jquery-ui.css" id="theme" />
<script src="https://ajax.googleapis.com/ajax/libs/jqueryui/1.8.16/jquery-ui.min.js"></script>

NOTES:

  • If you use the Messages and Alerts sidebar component, do not put empty lines in your code because the system will add a p html tag in it
  • Use absolute references to your Salesforce pages because managed packages have a different url structure

Question: How do I implement the AutoComplete part?

Answer: Now that jQuery is loaded and we have access to the Salesforce API, we can get down to actual business. The code I am personally using is below. Not being super confident with jQuery selectors, I am hardcoding the element names to add auto complete to into my code. The downside of this is if those element names change, it will stop working, but it’s an easy fix.

This code gets a list of element Ids and then loops through them, adding autoComplete (from jQuery UI) to each one. The “source” property of autoComplete uses the Salesforce API to look for Contacts with a name or email address LIKE what is being typed in. In this case, it is handling the situation where you already have multiple names separated by ; in the email field. You will also notice the line saying sforce.connection.sessionId = _my_sfdcSession;. This line associates the Session Id from that initial page we created to the AJAX API.

I have this code stored as a Static Resource called “AutoComplete_Email”.

$_org(document).ready(function() {
	
	// The elements to bind email autocomplete to
	var elems = [];
	
	// Add Email to Case Premium elements
	elems.push('pg:addCommentF:addCommentPB:emailCustomerPBS:additionalEmailsPBSI:additionalEmails_TextBox');
	elems.push('pg:addCommentF:addCommentPB:emailCustomerPBS:additionalCCsPBSI:additionalCCs_TextBox');
	elems.push('pg:addCommentF:addCommentPB:emailCustomerPBS:additionalBCCsPBSI:additionalBCCs_TextBox');
	
	// Add default Salesforce email fields
	elems.push('p24'); // Additional To
	elems.push('p4'); // CC
	elems.push('p5'); // Bcc
	
	$_org(elems).each(function(index) {
		var thisElem = document.getElementById(elems[index]);
		$_org(thisElem).autocomplete({
			minLength: 1,
			delay: 250,
			
			source: function(request, response) {
						
						var retVal = []; // array to return
						
						var queryTerm = $_org.trim(request.term); // term to search for
						if (queryTerm.lastIndexOf(';') != -1){
							queryTerm = queryTerm.substring(queryTerm.lastIndexOf(';') + 1);
							queryTerm = $_org.trim(queryTerm);
						}
						
						if (queryTerm.length <= 1){ 
							$_org(thisElem).autocomplete("close");
						} else {
							sforce.connection.sessionId = _my_sfdcSession;
							var result = sforce.connection.query("SELECT Id, Name, Email FROM Contact WHERE (Name LIKE '%" + queryTerm + "%' OR Email LIKE '%" + queryTerm + "%') AND Email != NULL ORDER BY Name LIMIT 20");
							it = new sforce.QueryResultIterator(result);
							while (it.hasNext()) {
								var rec = it.next();
								var retValItem = new Object();
								retValItem.label = rec.Name + ' (' + rec.Email + ')';
								retValItem.value = rec.Email;
								retVal.push(retValItem);
							}
						}
						response(retVal);
					},
				   
			select: function( event, ui ) {
						var tmp = $_org(thisElem).val();
						if (tmp.lastIndexOf(';') == -1){
							$_org(thisElem).val( ui.item.value + '; ' );
						} else {
							$_org(thisElem).val( tmp.substring(0, tmp.lastIndexOf(';') + 1) + ' ' + ui.item.value + '; ');
						}
						$_org(thisElem).autocomplete("close");
						return false;
					},
					
			focus: function(event, ui) {
				return false; // added so keyboard navigation does not overwrite the value
			}

		 });
		 
	 });
	 
}); // end of $_org(document).ready()

Question: Now how do I get this autoComplete code injected into the page?

Answer: Add some more code to the sidebar. The key parts are lines 6-9 below. This injects the script into the page. I personally make sure its only injected into the pages I want it to, which are the standard email pages in Salesforce and the Email to Case Premium “New Comment” page.

<script type="text/javascript">
if (
document.URL.toLowerCase().indexOf("emailauthor")!=-1 || 
document.URL.toLowerCase().indexOf("/apex/new_comment")!=-1
){
	var elem = document.createElement('script');
	elem.type='text/javascript';
	elem.src='/resource/AutoComplete_Email';
	document.body.appendChild(elem);
}
</script>

Question: What does this look like in the end?

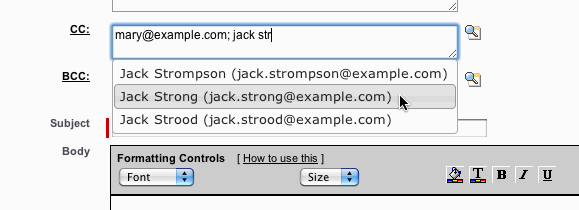
Answer: Below are 2 examples. There’s obviously more you can do with CSS. These are using the basic CSS from jQuery UI.

Salesforce Email Page

Email to Case Premium’s New Comment

Comments (21) comments feed

Proximity Searching via Apex

A new release of Geopointe will be out next week after all systems are on the Summer 11 release. With the update will come the ability to perform spatial/proximity/radial searches via Apex. Two new Apex methods are available for this:

  • radialSearchMapObject
  • radialSearchDataSet

These Apex methods enable Geopointe customers to utilize the proximity searching of Geopointe into advanced Apex logic. For information on all methods available to you, visit the Apex API page in the Help Center.

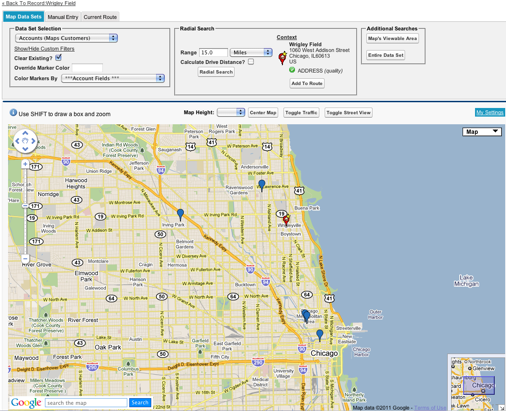
Let’s run an example.  The image below displays a query (via the Geopointe UI) of our Geopointe customers within 15 miles of Wrigley Field in Chicago. We want to accomplish this same query in Apex without ever needing the UI. Now we can and the geopointe.API class will help us with this.

Using radialSearchMapObject
This method allows you to perform a radial search against a Map Object (a Salesforce object enabled for mapping) and also allows the passing in of a custom filter. Here we are saying to search around the record with id a1430000001E32gAAC and to search the Account object with a filter of Type = ‘Customer’ for records within 15 miles.

geopointe.API.radialSearchResult result = geopointe.API.radialSearchMapObject(
     'a1430000001E32gAAC',
     'account',
     'type=\'Customer\'',
     15,
     geopointe.API.units.MILES);

system.debug(result);

Using radialSearchDataSet
The method below is accomplishing the same thing, but is using a pre-defined dataset that already has the filter for Customers built into it.

geopointe.API.radialSearchResult result = geopointe.API.radialSearchDataSet(
     'a1430000001E32gAAC',
     '12826856169860.9678661172894504',
     15,
     geopointe.API.units.MILES);

system.debug(result);

The radialSearchResult Class
Both methods result in a geopointe.API.radialSearchResult object, which is defined in the Geopointe Help Center. This object will return the record Ids closest to the center as well as the distances to these locations.

Comments off comments feed

Cloning Records in Apex

When you clone an sObject in Apex, it copies all the fields populated in that Apex object, not necessarily all fields on the record.  Let’s say you have a Lead with FirstName, LastName, Company,  LeadSource and Status populated.  If you do the following, the clone will not have LeadSource and Status cloned from the original record.  It will use the default values for Leads. That is because those fields were not queried into the object.

/* query lead and then clone it */
lead l = [select id, firstname, lastname, company from lead where id = '00Q3000000aKwVN' limit 1][0];
lead l2 = l.clone(false, true);
insert l2;

If you are cloning records, it can be frustrating to keep it updated as you add new fields to Salesforce. I generally want all new fields to be cloned too. I’ll code to any exceptions if needed. To help with this, I wrote myself a handy method to build me a SOQL statement and obtain all the writable fields.

public with sharing class Utils{ 

    // Returns a dynamic SOQL statement for the whole object, includes only creatable fields since we will be inserting a cloned result of this query
    public static string getCreatableFieldsSOQL(String objectName, String whereClause){
        
        String selects = '';
        
        if (whereClause == null || whereClause == ''){ return null; }
        
        // Get a map of field name and field token
        Map<String, Schema.SObjectField> fMap = Schema.getGlobalDescribe().get(objectName.toLowerCase()).getDescribe().Fields.getMap();
        list<string> selectFields = new list<string>();
        
        if (fMap != null){
            for (Schema.SObjectField ft : fMap.values()){ // loop through all field tokens (ft)
                Schema.DescribeFieldResult fd = ft.getDescribe(); // describe each field (fd)
                if (fd.isCreateable()){ // field is creatable
                    selectFields.add(fd.getName());
                }
            }
        }
        
        if (!selectFields.isEmpty()){
            for (string s:selectFields){
                selects += s + ',';
            }
            if (selects.endsWith(',')){selects = selects.substring(0,selects.lastIndexOf(','));}
            
        }
        
        return 'SELECT ' + selects + ' FROM ' + objectName + ' WHERE ' + whereClause;
        
    }

}

So if I want to clone the Lead I describe above, I’d do the following and this will ensure that I will clone all the fields on the Lead. Since the method only adds Creatable fields to the SOQL, I don’t have to worry about trying to set a formula field or system field and generating an error.

/* query lead and then clone it */
String soql = Utils.getCreatableFieldsSOQL('lead','id=\'00Q3000000aKwVN\'');
lead l = (Lead)Database.query(soql);
lead l2 = l.clone(false, true);
insert l2;

Comments (11) comments feed

« Previous entries