Archive for API Category Feed

Email AutoComplete (using jQuery)

For several years, I’ve been using an app called Email AutoComplete (it’s now a private listing) to add auto complete capabilities onto my email address text boxes in the Salesforce email editor.  It’s a nice little app.  However, Arrowpointe started using Email to Case Premium (an app I highly recommend) and I wanted to have similar capabilities on their forms.

The Email AutoComplete app works well, but it written using s-Controls and Yahoo User Interface Library v2, which adds a lot of confusing code into it. It was too hard for me to change and apply to the Email to Case Premium pages.  I looked for a jQuery approach and leveraged ideas from a great blog post on the Vertical Code blog. In my case, however, I was trying to add this capability onto an AppExchange “managed” (i.e. locked down) page and onto the standard email forms from Salesforce. I didn’t have the luxury of an Apex Controller and Visualforce.

Enter the AJAX API and jQuery!

Question: How do I obtain the Session Id?

Answer: Create a Visualforce page to act as a JavaScript file. In this case, I am creating a global JavaScript variable called _my_sfdcSession.

<apex:page sidebar="false" showHeader="false" contentType="application/javascript" cache="false">
  var _my_sfdcSession = "{!$Api.Session_Id}";
</apex:page>

Question: How do I enable API access in Salesforce and turn on jQuery so its usable whereever I am (almost) in Salesforce?

Answer: Use the sidebar to inject the code. I use the Messages & Alerts sidebar item, but the same could also be done using a custom sidebar component. The key is that the component always be in the sidebar.

The code below loads the Visualforce page above to get the Session Id. Then it loads the AJAX toolkit (from Salesforce), jQuery (from Google CDN) and jQueryUI (from Google CSN). Note that the jQuery instance is put into a new variable called $_org using the jQuery.noConflict() method. I chose that variable name because I am assuming it won’t conflict with other solutions that rename jQuery.

<!-- Load Session Id -->
<script src="https://na1.salesforce.com/apex/loadSessionId?core.apexpages.devmode.url=1"></script>
<!-- Load AJAX Toolkit -->
<script src="https://na1.salesforce.com/soap/ajax/23.0/connection.js" type="text/javascript"></script>
<!-- Load jQuery -->
<script src="https://ajax.googleapis.com/ajax/libs/jquery/1.7.0/jquery.min.js"></script>
<script type="text/javascript">
var $_org = jQuery.noConflict();
</script>
<!-- Load jQuery UI -->
<link rel="stylesheet" href="https://ajax.googleapis.com/ajax/libs/jqueryui/1.8.16/themes/base/jquery-ui.css" id="theme" />
<script src="https://ajax.googleapis.com/ajax/libs/jqueryui/1.8.16/jquery-ui.min.js"></script>

NOTES:

  • If you use the Messages and Alerts sidebar component, do not put empty lines in your code because the system will add a p html tag in it
  • Use absolute references to your Salesforce pages because managed packages have a different url structure

Question: How do I implement the AutoComplete part?

Answer: Now that jQuery is loaded and we have access to the Salesforce API, we can get down to actual business. The code I am personally using is below. Not being super confident with jQuery selectors, I am hardcoding the element names to add auto complete to into my code. The downside of this is if those element names change, it will stop working, but it’s an easy fix.

This code gets a list of element Ids and then loops through them, adding autoComplete (from jQuery UI) to each one. The “source” property of autoComplete uses the Salesforce API to look for Contacts with a name or email address LIKE what is being typed in. In this case, it is handling the situation where you already have multiple names separated by ; in the email field. You will also notice the line saying sforce.connection.sessionId = _my_sfdcSession;. This line associates the Session Id from that initial page we created to the AJAX API.

I have this code stored as a Static Resource called “AutoComplete_Email”.

$_org(document).ready(function() {
	
	// The elements to bind email autocomplete to
	var elems = [];
	
	// Add Email to Case Premium elements
	elems.push('pg:addCommentF:addCommentPB:emailCustomerPBS:additionalEmailsPBSI:additionalEmails_TextBox');
	elems.push('pg:addCommentF:addCommentPB:emailCustomerPBS:additionalCCsPBSI:additionalCCs_TextBox');
	elems.push('pg:addCommentF:addCommentPB:emailCustomerPBS:additionalBCCsPBSI:additionalBCCs_TextBox');
	
	// Add default Salesforce email fields
	elems.push('p24'); // Additional To
	elems.push('p4'); // CC
	elems.push('p5'); // Bcc
	
	$_org(elems).each(function(index) {
		var thisElem = document.getElementById(elems[index]);
		$_org(thisElem).autocomplete({
			minLength: 1,
			delay: 250,
			
			source: function(request, response) {
						
						var retVal = []; // array to return
						
						var queryTerm = $_org.trim(request.term); // term to search for
						if (queryTerm.lastIndexOf(';') != -1){
							queryTerm = queryTerm.substring(queryTerm.lastIndexOf(';') + 1);
							queryTerm = $_org.trim(queryTerm);
						}
						
						if (queryTerm.length <= 1){ 
							$_org(thisElem).autocomplete("close");
						} else {
							sforce.connection.sessionId = _my_sfdcSession;
							var result = sforce.connection.query("SELECT Id, Name, Email FROM Contact WHERE (Name LIKE '%" + queryTerm + "%' OR Email LIKE '%" + queryTerm + "%') AND Email != NULL ORDER BY Name LIMIT 20");
							it = new sforce.QueryResultIterator(result);
							while (it.hasNext()) {
								var rec = it.next();
								var retValItem = new Object();
								retValItem.label = rec.Name + ' (' + rec.Email + ')';
								retValItem.value = rec.Email;
								retVal.push(retValItem);
							}
						}
						response(retVal);
					},
				   
			select: function( event, ui ) {
						var tmp = $_org(thisElem).val();
						if (tmp.lastIndexOf(';') == -1){
							$_org(thisElem).val( ui.item.value + '; ' );
						} else {
							$_org(thisElem).val( tmp.substring(0, tmp.lastIndexOf(';') + 1) + ' ' + ui.item.value + '; ');
						}
						$_org(thisElem).autocomplete("close");
						return false;
					},
					
			focus: function(event, ui) {
				return false; // added so keyboard navigation does not overwrite the value
			}

		 });
		 
	 });
	 
}); // end of $_org(document).ready()

Question: Now how do I get this autoComplete code injected into the page?

Answer: Add some more code to the sidebar. The key parts are lines 6-9 below. This injects the script into the page. I personally make sure its only injected into the pages I want it to, which are the standard email pages in Salesforce and the Email to Case Premium “New Comment” page.

<script type="text/javascript">
if (
document.URL.toLowerCase().indexOf("emailauthor")!=-1 || 
document.URL.toLowerCase().indexOf("/apex/new_comment")!=-1
){
	var elem = document.createElement('script');
	elem.type='text/javascript';
	elem.src='/resource/AutoComplete_Email';
	document.body.appendChild(elem);
}
</script>

Question: What does this look like in the end?

Answer: Below are 2 examples. There’s obviously more you can do with CSS. These are using the basic CSS from jQuery UI.

Salesforce Email Page
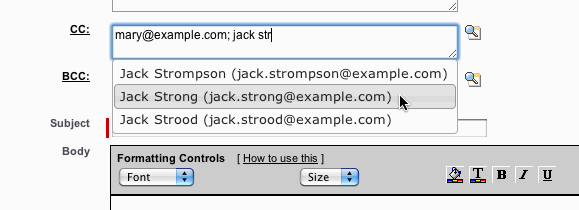
Email to Case Premium’s New Comment

Comments (21) comments feed

Calling Apex Web Services from PHP

Apex Code can be exposed as a Web Service and made available outside of your Salesforce environment (e.g. from a PHP page). This approach essentially lets you build a personal API into your Salesforce org and eliminates the need for calling standard API methods in PHP code where it is vulnerable to your configuration changes.

Working with the folks over at MK Partners on some recent projects, I’ve learned how to call into Apex Web Services from PHP. It’s actually pretty easy. Special thanks for Simon Fell for helping me through a particularly tricky part.

Apex Web Service Class

A simple web service class is below. The method we call from PHP is myMethod. There are 2 inner classes that are used to capture inputs and send back outputs to PHP.

global class MyWebService {

    // A class to accept an array of input records (e.g. product/amount combinations)
    global class myInputs{
        webservice Id productId;
        webservice Double amount;
    }
    
    // A class to send back as an output to PHP
    global class myOutputs{
        webservice String errorMessage;
        webservice Boolean success;
        webservice List<myInputs> inputs;
        webservice Id contactId;
    }

    // The actual web service method we will call
    webservice static myOutputs myMethod(Id contactId, List<myInputs> inputs){
    
        /* 
        * Write a bunch of code here to do all kinds of stuff.
        */
        
        myOutputs output = new myOutputs();
            output.errorMessage = 'No errors here.';
            output.success = true;
            output.inputs = inputs;
            output.contactId = contactId;
        return output;
        
    }
}
PHP

Login like you normally would using the PHP toolkit. Nothing new here. The final part is defining some constants for use later when we call the web service.

// Include the PHP Toolkit
require_once('salesforceAPI/SforcePartnerClient.php');
require_once('salesforceAPI/SforceHeaderOptions.php');

// Login
$sfdc = new SforcePartnerClient();
$SoapClient = $sfdc->createConnection('salesforceAPI/wsdl.xml');
$loginResult = false;
$loginResult = $sfdc->login('user@domain.com', 'password' . 'securitytoken');

// Define constants for the web service. We'll use these later
$parsedURL = parse_url($sfdc->getLocation());
define ("_SFDC_SERVER_", substr($parsedURL['host'],0,strpos($parsedURL['host'], '.')));
define ("_WS_NAME_", 'MyWebService');
define ("_WS_WSDL_", _WS_NAME_ . '.xml');
define ("_WS_ENDPOINT_", 'https://' . _SFDC_SERVER_ . '.salesforce.com/services/wsdl/class/' . _WS_NAME_);
define ("_WS_NAMESPACE_", 'http://soap.sforce.com/schemas/class/' . _WS_NAME_);

Next we will call the web service. First thing to do is setup a Soap Client and modify the headers. Then we are setting up some fake data that maps to the expected inputs of the myMethod method in the web service. Then we actually call the web service.

// SOAP Client for Web Service
$client = new SoapClient(_WS_WSDL_);
$sforce_header = new SoapHeader(_WS_NAMESPACE_, "SessionHeader", array("sessionId" => $sfdc->getSessionId()));
$client->__setSoapHeaders(array($sforce_header));

// Setup fake data to send into the web service
$prodAmtArray = array();
	$prodAmtArray[] = array('productId'=>'01t60000000lvBN','amount'=>100);
	$prodAmtArray[] = array('productId'=>'01t60000000lvBS','amount'=>200);

$wrkArray = array(
				'contactId'=>'0036000000nVtpT',
				'inputs'=>$prodAmtArray
				);
				
// Call the web service
$response = $client->myMethod($wrkArray);

// Output results to browser
echo "<p><pre>" . print_r($response, true) . "</pre></p>";
echo "Contact Id is " . $response->result->contactId;

Results

Below displays what those 2 echo statements output.

stdClass Object
(
    [result] => stdClass Object
        (
            [contactId] => 0036000000nVtpTAAS
            [errorMessage] => No errors here.
            [inputs] => Array
                (
                    [0] => stdClass Object
                        (
                            [amount] => 100
                            [productId] => 01t60000000lvBNAAY
                        )
                    [1] => stdClass Object
                        (
                            [amount] => 200
                            [productId] => 01t60000000lvBSAAY
                        )
                )
            [success] => 1
        )
)
Contact Id is 0036000000nVtpTAAS
One last little trick

One annoyance during the development of Apex Web Services is having to continually generate a WSDL for the web service. When testing, I would find that I would continually need to put a new WSDL on the web server. I decided to automate this where I could add a variable to the queryString and have PHP refresh the WSDL on my web server. You need the cURL module for this, but most PHP installs have it.

$ch = curl_init();
	$fp = fopen(_WS_WSDL_, "w");
	curl_setopt($ch, CURLOPT_URL, _WS_ENDPOINT_);
	curl_setopt($ch, CURLOPT_FILE, $fp);
	curl_setopt($ch, CURLOPT_HEADER, 0);
	curl_setopt($ch, CURLOPT_SSL_VERIFYPEER, 0);
	curl_setopt($ch, CURLOPT_SSL_VERIFYHOST, 0);
	curl_setopt($ch, CURLOPT_COOKIE, 'sid='.$sfdc->getSessionId());
	setcookie("sid", $sfdc->getSessionId(), 0, "/", ".salesforce.com", 0);
	curl_setopt($ch, CURLOPT_TIMEOUT, 30);
	curl_exec($ch);
	fclose($fp);
curl_close($ch);

If you have experience with this kind of integration, please comment here on other tips & tricks.

Comments (23) comments feed

Sidebar Summary using Visualforce

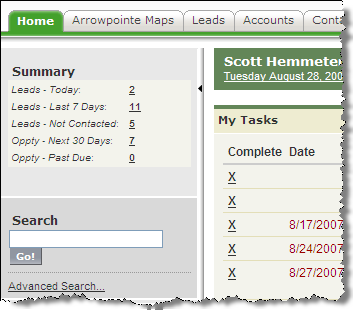
About a year ago, I posted about the Sidebar Summary.  The Sidebar Summary exists in the Salesforce.com sidebar and displays the counts of some important queries.  The counts are also hyperlinks to a view or report representing that query.  It’s a very handy thing to have in your sidebar and I use it all the time for my own work.  However, because it’s an s-Control, it runs a little slow.  In fact, it ran slow enough to make me uncheck the user interface option “Show Custom Sidebar Components on All Pages”.

I changed it into a Visualforce page with a custom Apex controller and now it runs super fast and I am able to keep the “Show Custom Sidebar Components on All Pages” option turned on and see it on every page I go to.  There’s a bit of hardcoding in here, but it gets the job done pretty well.  Bye bye s-Control.

Visualforce

The Page is almost all raw HTML.  The only dynamic thing in there are the count values.  Each one retrieves the value from a specific “get” method in the controller.  If you like the queries I use, then the only thing you’ll need to confirm are the URLs that get linked to.  The first 2 go to Views in my Org and the last 2 go to Reports in my Org.  You’ll need to change those URLs.

I named the VF Page “SidebarSummary”.


<apex:page controller="VFController_Sidebar_Summary" sidebar="false" showHeader="false" standardStylesheets="true">
<style type="text/css" media="all">
body{margin: 0; padding: 0; color: #000000; background-color: #E8E8E8;}
#DIV_Container {background-color: #F3F3EC;}
</style>
<div id="DIV_Container">
<table>
<tr><td><em>Unread Leads</em>:  </td><td><a href="/00Q?fcf=00B30000005JhsT" target="_parent"><b>{!UnreadLeads}</b></a></td></tr>
<tr><td><em>Leads - Not Contacted</em>:  </td><td><a href="/00Q?fcf=00B30000005Jhru" target="_parent"><b>{!NotContactedLeads}</b></a></td></tr>
<tr><td><em>Oppty - Next 30 Days</em>:  </td><td><a href="/00O30000001aEHV" target="_parent"><b>{!Next30DayOppty}</b></a></td></tr>
<tr><td><em>Oppty - Past Due</em>:  </td><td><a href="/00O30000001aEHV" target="_parent"><b>{!PastDueOppty}</b></a></td></tr>
</table>
</div>
</apex:page>

Apex

The controller has a method for each query to be run.  Each query is a count() query and returns an Integer.  At the end is a really lame Test method, but it does get 100% of the code covered.  I am certain the code works, so I didn’t do too much with the Test method.  Salesforce just requires the code to be tested.


public class VFController_Sidebar_Summary {

public Integer getUnreadLeads() {
return [
select count() from Lead
where IsConverted = False
AND IsUnreadByOwner = TRUE
];
}

public Integer getNotContactedLeads() {
return [
select count() from Lead
where IsConverted = False
AND Status = 'Open - Not Contacted'
];
}

public Integer getNext30DayOppty() {
return [
select count() from Opportunity
where IsClosed = False
AND (CloseDate = Next_N_DAYS:30 OR CloseDate = TODAY)
];
}

public Integer getPastDueOppty() {
return [
select count() from Opportunity
where IsClosed = False
AND CloseDate < TODAY
&#93;;
}

static testMethod void testVFController_Sidebar_Summary() {
Test.setCurrentPageReference(new PageReference('Page.SidebarSummary'));
VFController_Sidebar_Summary controller = new VFController_Sidebar_Summary();
Integer i1 = controller.getUnreadLeads();
Integer i2 = controller.getNotContactedLeads();
Integer i3 = controller.getNext30DayOppty();
Integer i4 = controller.getPastDueOppty();
}

}

&#91;/sourcecode&#93;

<span style="text-decoration: underline;"><strong>Homepage HTML Component</strong></span>

I created a component for the Narrow side and put the following HTML into the editor.  Essentially, you create an IFRAME and embed the VF page into it.  I found a (unsupported) trick on the forums to remove the developer bar from a page.  Just add <strong>?core.apexpages.devmode.url=1</strong> to the URL.  This will turn off development mode when that page is rendered.  This is important for this little iFrame page on the sidebar.  From what I've gathered, this hack is not supported and could change at any time.

The code below should work for you.  The only thing you might need to change is the Page URL if you didn't name your page SidebarSummary and the height of it.


<iframe src="/apex/SidebarSummary?core.apexpages.devmode.url=1" frameborder="0" height="100" width="100%"></iframe>

Let me know what you think.

Comments (24) comments feed

Getting Standard Object Meta Data into the Force.com IDE

Salesforce on Rails has an interesting post on how you can get the meta data for standard objects into the Force.com IDE for easy manipulation of its configuration via the Meta Data API capabilities built into the IDE.

Comments (1) comments feed

Upcoming Security Changes – overview of impact

Salesforce.com is making security changes on Monday Nov. 26, 2007. (Note that the rollout was pushed back a week from their original communications. It is now Monday Nov. 26, 2007)

There were a couple of webinars today about the changes. The customer-focused webinar will be available at http://www.salesforce.com/security soon. The partner-focused one will be available in the Partner Portal.

Below is my understanding of what was said and a high-level overview of the main impacts. Please add clarifications in the comments.

API Logins
  • If you connect via a Session ID passed from a web link/tab, none of these restrictions apply as the user is explicitly providing you with login access to his/her active session.
  • To login with a username and password, the IP address you are logging in from needs to be white-listed.
  • Salesforce will pre-populate the org’s whitelist with IPs used in the past 4 months.
  • Each end-user can generate an API token to replace their password for API logins.
  • API logins using the API token do not require their IP to be whitelisted.
  • API tokens do not expire. Only 1 is active at a time. It can be replaced by the user generating a new one. This automatically invalidates the old one.
  • API tokens cannot be used to login at https://www.salesforce.com/login.jsp.
  • Going forward, the best practice would be for end users to provide their API token to any app/service they use other than the main Salesforce.com login page.
Logging in at https://www.salesforce.com/login.jsp
  • Username and password will still be the way to access Salesforce.com from the main login page
  • A new feature will be added requiring you to confirm that your computer is valid to login using that username.
    • The login page will check if you’ve logged in from that computer before (by looking for a browser cookie)
    • If not, the email address on the user record will be sent an email to confirm that you are, in fact, the one trying to login now.
    • You will click a link in that email “activating” your computer for login with that username
    • Unless you delete the cookie or clear your broswer’s cache, you should be good to go for a while without repeating these steps.
  • There are no new IP restrictions affecting logins at the main login page. The profile-based IP restrictions that have been around for a long time are still the way to go there.

If you are a consultant, you may fall victim of the new security measure when you try to login as your client (maybe they couldn’t afford another temporary username just for you). On the call, I was told that you can request a temporary one via the Partner Portal or ask your customer to forward you the email to confirm your PC is okay.

My thoughts

I think it is great to see Salesforce taking a step to tighten up the API, especially. I like to think that my old API Authentication List post had something to do with it, but who knows.

The biggest impact to me will be using client’s logins to get into the system from my PC, but I’ll just have to workaround that one. Security and convenience are generally a trade off and overall I’d rather use/subscribe to a service that is tightened down with my business data. If anyone can handle the inconveniences of logging in, it’s developers since we are used to doing hacks/workarounds in the first place.

Comments (3) comments feed

« Previous entries